Resin-inlaid Wood
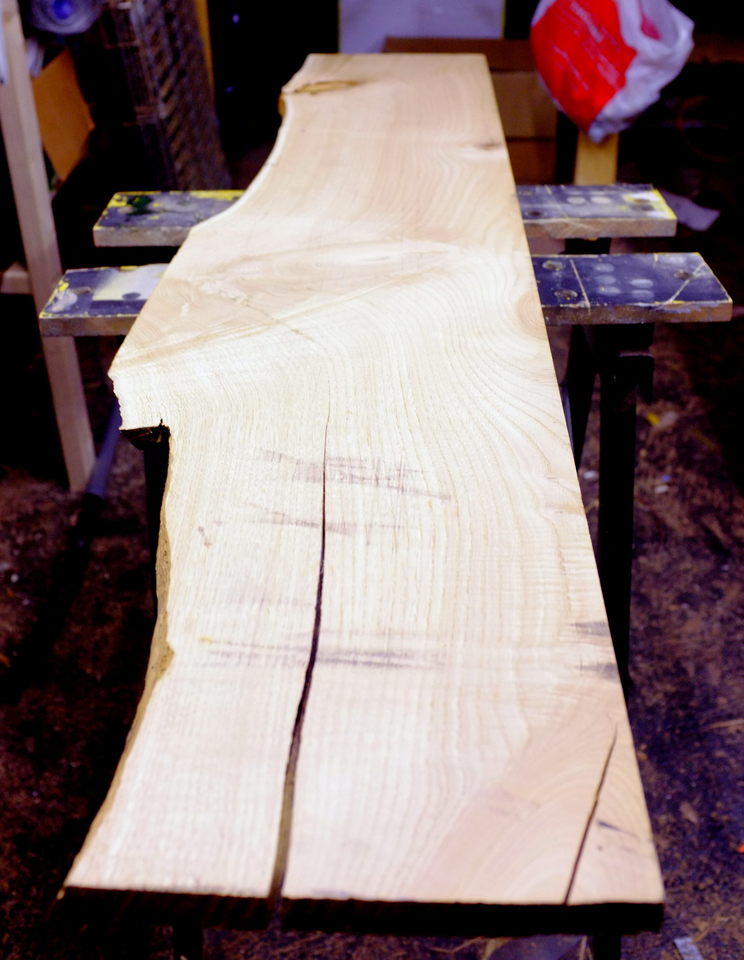
A non-jewellery post, for a change. We were running a bit short on shelving in the kitchen and wanted somewhere we could store all the preserves we're going to make from the garden this year, so we went to the timber yard to see what they had. They had this, 155cm long piece of chestnut.

Make sure the wood is level, otherwise you'll end up with wonky resin bits.

Now it's time to mix the resin. Give it a good mixing and then add your pigment. If you warm it up a bit, on a heater or with a hairdryer or something, the bubbles will pop out of it much more easily. Bubbles can ruin resin casts, so carefully mix and warm the resin, then let it sit for a while, before pouring. It's going to take hours, even days, to cure, so half an hour to de-bubble isn't a problem.

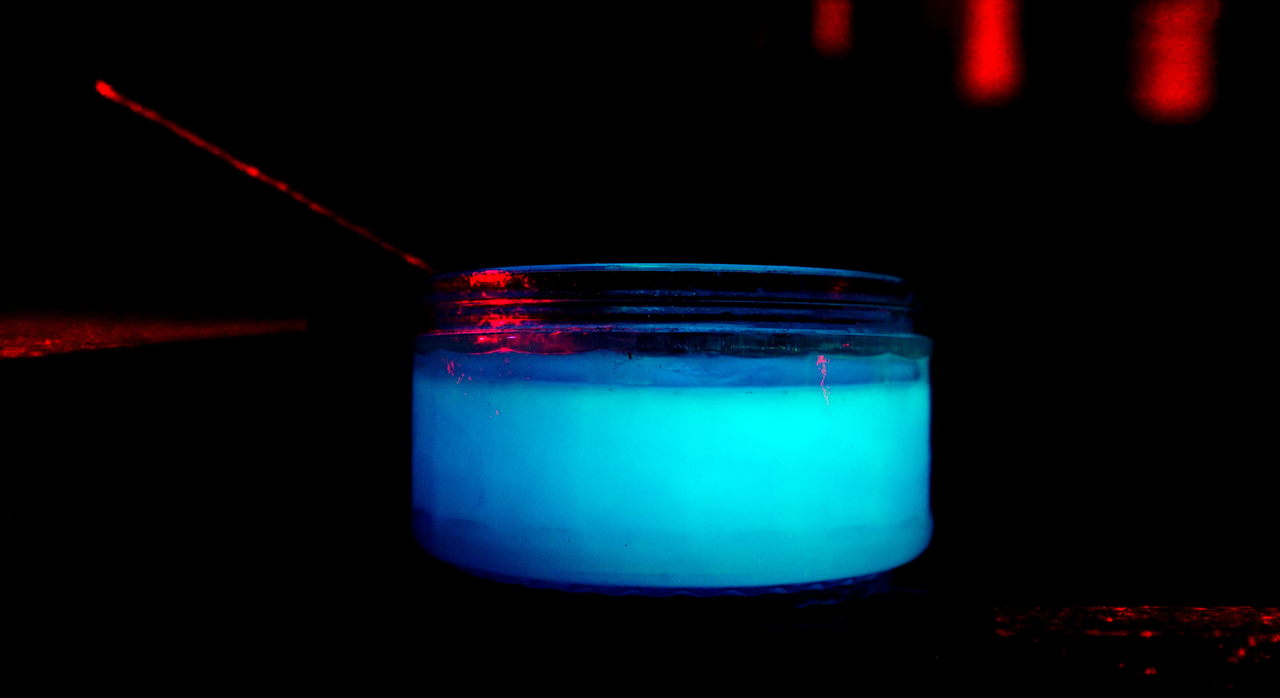
 You know when I said this isn't going to be a traditional inlay? Here's the pigmented resin in darkness. Awww yeah. This is going to be great.
 So, pour it in, and wait. Come back in an hour or so to make sure none of your seals are leaking. If they are, slap some more tape on and refill with resin.

 However long you think it's going to take, leave it longer. This was poured in spring so took three days before it felt hard to the touch, then I left it another three days just to be sure. Now, peel off your tape and it's time to sand/plane/etc.
 The overpour around the edges where the resin has soaked into the wood is going to be a pain to remove. But I can already tell this is going to look amazing.
 More sanding. I'm really skipping over a LOT of work here. I spent hours, and hours, carding, planing and sanding this. Chestnut is hard! But eventually, it was done. I cut the big piece into the three shelves it was going to be, and on to my favourite part. Boiled linseed oil cut with white spirit. I love that first wipe of oil when the grain of the wood just leaps out at you. Makes all those hours of preparation worth it. Gave it about eight or nine thin coats, looks incredible.
 View from the end. Visible inlay and spalting. Still a bit of woodworm damage visible.

Now it's time to get these up. The brackets are grey to match the colour the wall is going to be once it's been repainted. I had some bits of walnut around to make the other brackets.

 And, they're up. In daylight they look like this:
 Now, in darker conditions, you can really start to see the glow resin in action.

I think this one is my favourite. It's on the bottom of the top shelf, so it's visible in normal use.
 Wall robot approves.

So there you go. Blue glow inlay into chestnut.
Unrelated link to my Etsy store.
It was pretty heavily cracked and pitted, with knotholes and so on. But, I had a plan. Resin inlay. A technique traditionally used with a colour-matched epoxy to the wood, to give an "invisible" repair. I'm taking a slightly different approach.
First job, seal off the holes from the bottom, using aluminium plumber's tape. It's super sticky so it seals well, and it won't be damaged by the resin either. You might need these seals to hold for a few days, depending on the weather.
Make sure the wood is level, otherwise you'll end up with wonky resin bits.
Now it's time to mix the resin. Give it a good mixing and then add your pigment. If you warm it up a bit, on a heater or with a hairdryer or something, the bubbles will pop out of it much more easily. Bubbles can ruin resin casts, so carefully mix and warm the resin, then let it sit for a while, before pouring. It's going to take hours, even days, to cure, so half an hour to de-bubble isn't a problem.
Now it's time to get these up. The brackets are grey to match the colour the wall is going to be once it's been repainted. I had some bits of walnut around to make the other brackets.
I think this one is my favourite. It's on the bottom of the top shelf, so it's visible in normal use.
So there you go. Blue glow inlay into chestnut.
Unrelated link to my Etsy store.


Will you share where you got your glow powder? United Nuclear, maybe?
ReplyDeleteAny automotive paint supply company that carries house of kolor products can order this powder for you. It's called cosmic glow powder used in clear coats on custom paintwork
Deletewhere did you get the wood from?
DeleteLoads of people on Reddit were asking that too. I wish I had an answer, but it's been so long since I bought it, I honestly can't remember. I think it was from here: http://www.kilabitzzz.co.uk/
ReplyDeleteI found some here : http://fndeco.com/en/135-glow-in-the-dark-pigments
ReplyDeleteMuchas gracias
DeleteThanks.
ReplyDeleteThis is pure genius! Thanks for sharing the tip :-)
ReplyDeleteIt looks like UV reactive day glow powder rather than glow in the dark powder, which is white under daylight conditions.
ReplyDeletehttp://www.kilabyte.biz/store/Ultraviolet-Fluorescent
vs. http://www.kilabyte.biz/store/Glow-In-The-Dark/Glow-In-The-Dark-Powder
This is why I'm not sure about it. It definitely glows in the dark! But it's also blue under daylight, and it reacts to UV. The powder I have is light blue and - as you can see from the photos - is visibly blue.
DeleteI bought it a few year ago, it could be an old formulation. Or I could have bought it from somewhere else entirely. I wish I could remember.
This powder is light blue at daylight it charges from a lightsource (like bulb or sunlight) and glows blue in the dark: http://fndeco.com/en/glow-in-the-dark-pigments/3265-unikromglow-decor-paint-pigment-powder-skyblue-15g.html
DeleteIt might be similar to this "triple glow" product. Apparently it is blue in daylight, and glows in both darkness and uv--unlike their neutral glow product which only glows in the dark and is a white in daylight. I'm not sure of the reputation of this company, but it's worth giving a shot.
Deletehttps://www.glonation.com/glow-in-the-dark-products/triple-glow-powders.html
Stunning work! I've got a beautiful piece of timber here full of knotty holes that I've been meaning to resin fill. You've inspired me to stop talking about it and do it. Thanks!
ReplyDeleteRegarding the powder, maybe this is it? It mentions being able to be mixed with resins in the description, and it seems to be the same/a similar color: http://www.kilabyte.biz/store/Pigment-Powder/Aqua-GITD-pigment-powder
ReplyDeleteWood has to be bone dry or the resin will react with moisture in the timber
ReplyDeletewas the glowing paint it in powder form or liquid?
ReplyDeletePowder. There's a photo of the bag of pigment in the post above.
DeleteThis comment has been removed by the author.
DeleteIf you are very, very careful you can fill gaps without needing to sand afterwards. But you have be very accurate at both pouring the resin and at levelling the wood first. It's not impossible, it's just hard.
DeleteI have done it, but only on very small pieces.
What about using a syringe to fill it?
DeleteAll I can think is Blizzard, WoW
ReplyDeleteI found it here! https://www.glonation.com/glow-in-the-dark-products/triple-glow-powders.html
ReplyDeleteThanks Anastazia! I am ordering the multi color pak for a project I am doing!
DeleteWhat was the ratio of resin to powder?
ReplyDeleteI didn't measure, just eyeballed it. There was maybe 4-5g of pigment in perhaps 100ml of resin? That's just a guess mind..
Deletethat is great a good starting point. I will be ordering some powder and creating some sample pieces with different ratios. I will post my findings.
DeleteHow much of the hardener do u use and how much of the resin?
DeleteYou can easily find the powder on eBay or Amazon, and it comes in a variety of colors, simply search for "Strontium Aluminate Powder" and there should be a number of options!
ReplyDeleteThis is absolutely incredible! I have a huge slice of trunk from an old maple that was taken down, and this would be perfect for it. It developed an enormous crack while drying in my garage, and I've been too sentimental about it to throw it out! Now to find a large enough planer...
ReplyDeleteWoah! Amazing job. I've a question... Do you mix the resine, the powder AND the hardener at te same time, or you just mix the resine and the powder, and later you add the hardener directly in the wood?
ReplyDeleteSorry for my English!
Resin and hardener and powder all at once. Your English is good! :)
DeleteThank you. You're a really nice guy!
DeleteWonderful idea and a lot of effort for a few jars ;)
ReplyDeleteHi there , first of all, WOW AMAZING ! wanna try this so badly now ^.^
ReplyDeleteBut I have a question, you said the next thing:
" - Boiled linseed oil cut with white spirit. I love that first wipe of oil when the grain of the wood just leaps out at you. Makes all those hours of preparation worth it. Gave it about eight or nine thin coats, looks incredible. - "
What is the ratio of white spirit against the linseed oil ? And is this mixture like a varnish or more like a wood mordant ?
thanks in advance !
Probably 50/50 for the first coat, then moving to around 70/30 oil/thinners for the others. But that's just a guess. I don't measure, I just add white spirit until the oil looks about thin enough.
Deletethank you for the fast reply ! will try this out.
Deletedo you boil the mixture or do you just boil the linseed oil and add the white spirit afterwards ? And do you use the mixture still warm or let it cool down before use ?
thx !
"Boiled linseed oil" isn't actually boiled oil, it's a treated linseed oil that dries faster. You can buy it at most DIY suppliers, it's not expensive. I mix the white spirit in a little jar before use, making small batches.
Deletehttp://en.wikipedia.org/wiki/Linseed_oil#Boiled_linseed_oil
thank you a lot! From Belgium here so that's why I didn't recognize it by the name :)
ReplyDeletewill do some shopping tomorrow !
Happy to help! Best of luck with your project! :)
DeleteHow long does the glow last in the resin?
ReplyDeleteDepends on how long you charge it for, and the size of the piece of resin. Perhaps a couple of minutes at full brightness, but it's visible in a dark(ish) room for maybe an hour?
DeleteDoes this mean that after 3 days of hard work it will only glow for an hour?
DeleteAn hour or so for each time you charge it up.
DeleteI've got bits of this resin over a year old which still glow, but they need charging each time.
Have you seen glow in the dark things before? It works very much like all the other glow stuff out there.
Oooh i get it now. So with ''charge'' you mean like for the shelve to be exposed in light?
DeleteExactly. :)
DeleteHYPOTHETICAL QUESTION? IF I BUILT A COFFEE TABLE THAT WOULD BE PLACED ON A DECK OR PORCH THAT GOT CONSISTENT SUNLIGHT.(ALL DAY) POTENTIALLY, WOULD THE RESIN GLOW FOR A LONGER PERIOD OF TIME? LONGER CHARGE, LONGER GLOW TIME???
DeleteNO IDEA, SORRY. WHY ARE WE SHOUTING?!
DeleteTaiwan's news to see your article, it is a good idea, I will use my fishing rod, thank you for your inspiration.
ReplyDeleteThere's a product made by the smooth-on company that could alsi work. It seems to be very long lasting as glow goes.
ReplyDeleteWould you ever consider making shelves like this to sell on your Etsy store? These are really great and I know I'd buy some if they were for sale.
ReplyDeleteI may try to do that. It's a bit difficult with shipping and storage (I don't have much space to store unsold shelves!) and so on, but if you follow me on Etsy you'll see if/when I do anything along those lines.
DeleteThis comment has been removed by the author.
ReplyDeleteso about how many oz is in that bag? I'm trying to do a similar thing, but with an arcade stick and I'm trying to figure out how much to buy...
ReplyDeleteThat was a 25g bag, I think. But it wasn't full and I didn't use it all. Perhaps 10g per 150ml of resin?
DeleteCool project, thanks for sharing. I'm not familiar with resin, but your project has my wheels turning, so I thought I'd ask. It sounds from your description like you started with a single piece of chestnut, then poured the resin into the cracks, let it cure a really long time, and then you were able to cut the whole sandwich, resin, chestnut and all, into your three shelves. How does resin stand up to cutting with a saw like this? I'm thinking about making a sort of wood & resin "laminate." I'd start with a couple of pieces of wood, clamped in such a way that there are small gaps in between each piece. After pouring the resin in & letting it fully cure, I'd cut the ends off (perpendicular to the direction of the resin "gaps"), hopefully leaving me with a finished board that has translucent, resin stripes. Would something like this work? Can the resin handle being cut by a saw like that (or can the saw handle the resin...), and will the resin bond to the two strips of wood so that the whole thing acts like a single board after it's finished?
ReplyDeleteThe resin is easily cuttable, sandable and so on. It's just solid plastic once it's cured. I'm assuming your post is missing some links about the type of saw, but I used a high power bench mitre saw so if that's OK, then almost anything will be OK.
DeleteYour laminate idea should work, but don't quote me on that as I haven't tried it. If you do a quick test run you'll know for sure.
thanks Mat. Yeah, I haven't really thought through this too much yet, but I'm willing to pick up a little resin and do a test run. Like I said, your project really got the wheels turning for me. Key things for me are 1) translucency and 2) a reasonable bond between the layers. Doing a mockup should be pretty easy.
DeleteVery inspiring project, thanks for sharing. I have very similar question to the one above and would be very curious to know how the trial run went. I am thinking of making a table from a palette and want to fill the gaps between planks with resin. Now my question is very similar in that I would like to know how well does the resin bond with wood (I am afraid those strips of resin will just pop out) and how flexible vs. rigid resin is (I am afraid the long resin strips will crack as the wood responds/flexes due to transportation or temperature change). Will greatly appreciate any thoughts or ideas you guys might have.
ReplyDeleteThe resin bonds really well with the wood - you'd have trouble removing it even if you wanted to, let alone by accident.
DeleteAs for flexibility, I'd say it's probably rigid enough to be a table but flexible enough to not shatter while moving or with heat. The cured resin is very similar to solid nylon. But don't quote me on that - run a few test pieces yourself.
Mat. Thank you very much for such a quick answer. That’s about all the info and especially encouragement I needed to try it out. Thanks a lot.
DeleteHey Matt I'm trying this project out, and I was told polyurethane would probably work the same as resin. Well, the glow powder I ordered seems to just sink to the bottom and doesn't mix very well. I was wondering if you thought poly should work the same, and if I could get the name of the brand of pigment powder you used.
ReplyDeleteI think the pigment I used is this one: http://www.ebay.co.uk/itm/Ultra-Glow-Dark-Fluorescent-UV-pigment-powder-20g-Use-Plastidip-/151155603503?pt=UK_Crafts_Other_Crafts_EH&var=&hash=item68d3395648
DeletePoly resin should work OK, you might need to let it go off a bit before mixing the pigment in, so it's a bit thicker. But I haven't got any experience of that, so I'm only going on what other people have told me.
Hi Matt. I've bought two lots of glow in the dark powder, one from Killabitz and one from Glonation. I keep having a problem where the glow in the dark powder in the pigment is sinking to the bottom as the resin drys so I'm left with the bottom looking rather yellow under normal light but glowing brilliantly at night whereas the top is a nice blue during the day but doesn't really glow at all. May I ask if you went through any particular process when mixing the powder and the resin together, or did you leave it for a while before you applied it? Many thanks Mat.
ReplyDeleteHi Richard, I haven't had this problem but some other people have - reports are that if you let the resin cure a bit before mixing, so it's a bit thicker and goopier, that sorts the problem out. I can't confirm that myself, but more than one person has told me it works. Best of luck!
DeleteThanks Mat, sorry for another question but do you know how long they left it? Not to worry though I shall experiment with it anyway. Thanks ever so much for getting back to me.
ReplyDeleteNot a clue, sorry. Curing rates are very dependent on things like temperature, humidity and so on.
DeleteSomething you could do though is heat up the resin (gently!) which will make it (a) cure faster and (b) make it runnier. So if it's slightly gloopy when warm and you then pour it into a cold bit of wood, it will cool down (and thus thicken) quite quickly.
Wow, this is an awesome project, i love it... any idea on the amount of pigment used to ratio of resin??? Thanks for sharing your amazing skills!!
ReplyDeleteI'll be honest with you, I have no idea. I just eyeballed it. It's easy enough to do.
DeleteThere's maybe 10g of pigment in 100ml of resin?
Where did you get the wood? or rather what did you ask for?
ReplyDeleteI stopped at 3 lumber yards today and I couldn't find anything as rough (natural maybe?) and I can't seem to have any luck online. Right now I'm thinking I'll just have to carve something into a wood piece and then put resin in that, but even if that was done well I doubt it'd have the same result.
Hi Alex, I didn't ask for anything - the wood was just leaning up against the wall in the woodstore. But then I do frequent a specialist woodyard, he often has pieces like this in addition to sawn/planed timber. A standard lumber supplier probably won't carry anything like this.
DeleteeBay might be worth a look? There's occasionally people near me selling off bits and pieces they've had in their shed or whatever.
Alright thanks Mat!
DeleteI just put in my order for a few boards for my own project, I'm using black walnut and green pigment. Should I still use linseed oil for the finish?
I'll be sure to post a link to my project, once I finish it that is.
The finish is up to you, depends entirely on your preferences. Some people like oils or waxes, some prefer poly varnishes or even old school things like shellac. I think oils look nice with woods like chestnut or walnut, but it's entirely up to you. In my experience walnut is very "thirsty" and will take a lot of whatever finish you use on it - but it will look great when it's done.
DeleteBest of luck with your project! :)
Did you use epoxy or resin?
DeleteI can't find any hardener at the stores near me, so I can't seem to use resin. Epoxy looks like the results are about the same.
I've used epoxy before and it's main problem is that it's too thick to allow bubbles to move out of the mixture before it cures. I always end up with visible bubbles when using epoxy.
DeleteYou can get casting resin online pretty easily.
Hi Alex, Here's some great techniques/ideas to "carve" wood for some extra special effects. Cheers, Steph
Deletehttps://au.pinterest.com/pin/172473860710580113/
Matt, thanks for the post on this . . . I read and used the info on the powder to resin mix 4-5 per 150 ml, and the powder seemed to drift to the bottom of the container, and turned out more clear then blue, then I read on another post you said 10 grams per 150ml. I am going to finish it in a few days with the 10 grams, just wondering if I am missing something other than slow mixing, warming/sitting, prior to pouring it in the cracks of our table to avoid all the powder on the bottom of the pour-container? Sorry for the long-winded post.
ReplyDeleteI guessed the amounts when asked because when I was doing it, I just did it by eye. Kept pouring in pigment until it looked right. I'd suggest doing the same, especially if you don't have the exact same brand of pigment or resin as me (and as I'm fairly sure the pigment I have isn't sold any more, you probably don't)
DeletePigment settling out during curing is not a problem I've had, so I don't really know how to fix it. Sorry about that. You could try letting the resin cure a bit so it's thicker before pouring, but I can't make any promises that will work.
Sorry I can't be more helpful.
No problem, I sent you that mesage only an hour or two after pouring it, but now it is fading to a deeper blue after 4-5 hours later, so I think it is handling itself. Trial and error . . . Thanks for your time. --Mitch
ReplyDeleteHey there! Would you be kind enough as to let us know if your results where succesful and where you got your pigment from please? Thank you!
DeleteHey Matt, superb project, thank you for sharing! I'm thinking of applying your technique to an outside staircase. It was built in aluminum but the steps are flexing and some are already bent. So I'm thinking of removing them all to replace them with something inspired by your idea. I would create a rectangular mold, 32" x 3" x 12" and then poor the resin with the pigments and repeat for every step. Do you think that it's feasible?
ReplyDeleteMy gut feeling is that the resin on it's own won't be anywhere near strong enough. But I could be wrong.
ReplyDeleteCertainly worth doing a test piece to see how it goes.
Thank you for your reply. We've done an amazing floor here, everybody who sees it is flabbergasted: we used epoxy mixed with chrome and with a large squeegee we applied it. It creates a very interesting pattern. It can be applied over concrete or plywood, so I'm thinking of creating wooden boxes for the steps, adding the glow in the dark pigments to the epoxy and chrome mix and then coat the steps in the solution.
DeleteI'm saying this because I just saw a video of the guys who manufacture your resin and they insist on not mixing large quantities otherwise it creates a chemical reaction, it heats and fails. So epoxy may be a better option in my case. But the glow in the dark pigment is genius, thank you again for your post!
I interested to this,and i have a question,is the resin and pigment are in one pack,or separated? Im waitin for the answe, thanks mat...
ReplyDeleteTwo different packs. You can find links in the comments on how to find both.
DeleteThanks for the response....
DeleteThis comment has been removed by the author.
ReplyDeleteDepends on the resin. Some types of resin are polishable with very fine sandpaper and then liquid polishes - like you'd polish metal or plastic. Other resins need a very quick pass with a blowtorch, which will melt the surface layer and leave it smooth and glassy.
DeleteI was told by a paint pro that even when mixed with resin the glow effect will dissapate after a few months. Is yours still glowing or is that glowing look gone?
ReplyDeleteMine is still going. I've got resin pieces over a year old which are still glowing fine.
DeleteI suspect it depends a lot on which pigments you use.
Hi,
ReplyDeleteAs we get a lot of enquires about this I thought I'd best let you know the product.
It uses our Ultra Glow in the dark fluorescent powder. Unlike other pigments on the market it has colour in daylight, glows in UV blacklight and glows in the dark.
It will keep working for more than 10 years. That is being able to be charged and then glow (not continue glowing for over 10 years with a single charge!).
Search on ebay for item 281104397518
or this direct link:
http://www.ebay.co.uk/itm/Ultra-Glow-Dark-Fluorescent-UV-Blacklight-reactive-pigment-powder-20g-/281104397518?pt=UK_Crafts_Other_Crafts_EH&var=&hash=item87166128c7
This used our Aqua blue colour but we have 12 other colours also.
I hope this helps.
Nigel (Kilabitzzz Ltd)
Hehe, thanks Nigel. Glad you're getting lots of business from this, I've used quite a few of your products and they are great quality.
DeleteBuy from this man, he knows his stuff!
Thanks Mat
DeleteLots of new pigment powders will be available next year in our new webshop
www.GlowInTheDarkShop.co.uk
I have them in stock just got to find the time to take photos and get them listed :)
Hi Nigel,do you ship pigments to Australia? Cheers, Steph
DeleteHome Depot epoxy resin did not work with the pigments. Would not harden.
ReplyDeleteHowever, I found this epoxy online and it worked fine. Just in case anyone in the states is looking to do this.
www.ultraclearepoxy.com
Thanks mat for this wonderful idea, as I am new to resin things can you help to sort out my few questions?
ReplyDelete1. In which ratio should I mix resin against hardener?
2. Is it like "More you warmup mixture less time to hard it" ?
3. And in-case color pigment not dissolve in mixture, heating mixture can solve this?
Thanks again..waiting for your response.
Hi Ashish,
Delete1. It depends on the resin you use, look at the instructions for the resin you have.
2. Usually, yes. But the warmer it is, the more runny/thin the resin is.
3. Again, depends on your resin. I never had a problem mixing the colour into the resin.
Good luck with your project!
Thanks for reply,
ReplyDeleteActually I didn't find any standard resin from my local market, So I purchased around 1kg loose pack from local vender who also gave me around 200ml hardener and 200 ml liquid cobalt (As this is only for R&D and then I'll definitely find some standard resin for my project).
As I ask him what ratio should I take, he said he is just seller not any expert so can't help any more and his duty is only sell some chemicals. Also he gave resin which is used for photo framing.
Whatever I will adjust that ratio, but I have one question... Any clue? For what purpose that liquid cobalt use?
Thanks again
My guess would be 200ml of hardener is enough for 1kg of resin, but that's just a guess.
DeleteNo idea what the liquid cobalt would be for, sorry.
There is a custom knife company (Dogwood Custom Knives) that has glow handles, some of them glow for hours, some all night long. I don't know what he uses but they are worth looking at!
ReplyDeleteThis comment has been removed by a blog administrator.
ReplyDeletevery interesting
ReplyDeleteThanks for the inspiration Matt. Here's my first try at this that I exhibited at Maker Faire 2015 San Francisco:
ReplyDeletehttp://makerfaire.com/maker/entry/50826/
That's totally awesome! So glad I could provide some inspiration. :)
DeleteI've seen a few projects like this, and I must say, by far, yours is the best. At least from my point of view. All of the other projects have a lot of glowing resine, it looks overloaded. Yours seem to have just the right amount of it.
ReplyDeleteI tried to do this with a coffee table, it didn't work(I overestimated the leaking properties of the resine :P) I'll try again later.
I think you have a very nice taste, based on this and your other projects :)
Thanks for the tutorial
Gorgeous, thanks!
ReplyDeleteHi there, just a bit confused....are epoxy and resin the same? And is this also the hardener?
ReplyDeleteOr do I just need to buy epoxy and powder pigment to achieve this.?
Thanks
"Epoxy" just means a two-part thingy consisting of a resin and a hardener - it's often used to refer to the glue, but casting resin is an epoxy too.
DeleteIf you try this with epoxy glue, it won't work. I have tried that. :)
Make sure you have "water clear casting resin" and you should be fine.
This comment has been removed by a blog administrator.
ReplyDeletehi , I was just wondering what exactly is the name of the resin? did you use crystlaline resin or epoxy or? Also which resin would take colour best for a piece of furniture? How did you colour your resin, glass inks or powdered pigment? thanks
ReplyDeleteI used crystal casting resin, as pictured above. Epoxy resin should work fine, but epoxy glue will not.
DeleteIt was coloured with a powder pigment, which I got from here: http://www.glowinthedarkshop.co.uk/
I'm not sure if glass ink would work but you could always do a test piece and see.
Thanks for replying. Have you ever used polyester resin? would this take colour better ?
DeleteI haven't, but poly resin finishes clear so it should be fine. If I were you I'd run a test piece and see how it goes.
DeleteLovely piece of artwork Mat!..I've thought I might do some resin-casting work for a kitchen worktop..inlaying metal cogs and such..But incorporating into wood..Great idea..Thanks for sharing..
ReplyDeleteHow do you sand it without the resin heating up and balling? What sander or grit?
ReplyDeleteI honestly can't remember. I don't recall doing anything special, I usually have 120/180/600/1200 grit papers in my workshop, so I'd assume I went through those in that order.
DeleteI mostly sanded by hand, but I do have a cheap power sander that I use occasionally.
I was wondering that too, I tried a piece myself but when I sanded (up to 600grit) it just looks cloudy, when I would really like it to look like untouched shiny resin. Did you use a heat source or anything to try and glass it over?
DeleteThanks for the blog it was super helpful and made a cool gift regardless!
It depends on the resin. Some types you can flame polish to a glassy finish, but other resins you need to polish to a high grit (2000 or higher), then finish with a plastic polish.
DeleteHow do you sand it without the resin heating up and balling? What sander or grit?
ReplyDeleteI live in the U.S. and www.glowinthedarkshop.co.uk/ does not deliver to the U.S. (sad face). Do you, or anyone reading this, know of a just as good product I can order for delivery here? Thanks!
ReplyDeleteI suggest scrolling up a bit, there are plenty of suggestions in the comments, if you can sort through them!
DeleteHello Mat, I enjoy your project but I have a small problem. I can't purchase any type of resin that you are using in the home country, and the possibility to by it online is limited to my country. My question is that if I can replace the resin that you are using with another one like this one: http://www.bison.net/static/products/assets/asset_9038_2.pdf?
ReplyDeleteHi Oana,
DeleteYou cannot use that sort of epoxy - that is glue, not casting resin. If you search for "water clear casting resin" you should be able to find something. Expect one big bottle and one smaller one, rather than two the same size.
I hope that's helpful, and best of luck with your project!
Thank you vey much for the quick reply ... I've just found the product that you used in my country, my husband made a nice gift :)
ReplyDeleteThis is a very good modern twist to the Japanese tradition of wabi-sabi, they often repair broken items of wood or ceramic with gold or bronze - this looks a lot simpler! Thanks so much for sharing.
ReplyDeleteVery nice indeed. When you removed the tape, after your resin dried, did it leave a nice surface, or did you have to do anything to it. I realize you sanded the top to get the excess off, but what about that corner bit on the outside or even the end pieces?What did you use to sand it? Thanks bunches.
ReplyDeleteI believe I sanded it a little with some fairly fine sandpaper to smooth off the edges and to get the slightly satin/matte finish I was after. You can polish it to gloss as well if needed.
DeleteHi Mat...So is this plumbers tape sticky? And if so, is it sticky side to the Resin? What would you use to polish if you weren't going for a matte finish. I'd like to do something like this, but would want it clear like glass. Thanks bunches!!
DeletePlumber's tape (also known as aluminium tape) is super sticky, which is how come it can seal the resin in. Sticky side to the resin, definitely.
DeletePolishing depends on the resin, some you can polish with sandpaper/liquid polish/etc, like you would metal; some resins polish with a technique called "flame polishing" (google that!) so check with your resin brand first. A test piece is always a good plan too.
How i got this itam in india
ReplyDeletehai mat
ReplyDeleteI am interested in your inspiration , can you help so that I could buy Cristal Resin and Pigment resin glow , I come from Indonesia
thank you and apologize
If you read through the comments here you might find some places to get them from, or you could search Google. I'm afraid I don't know any suppliers in Indonesia. Good luck with your project!
DeleteThis comment has been removed by a blog administrator.
ReplyDeleteHere is the glow listing:
ReplyDeletehttps://www.etsy.com/listing/278093654/ultra-glow-in-the-dark-fluorescent-uv?ref=shop_home_active_5
Thank you vey much for the quick reply ... great ideia! Its beautifull!
ReplyDeleteThis comment has been removed by the author.
ReplyDeleteDid you cut these after filling in the gap or before that? What cutting tool would you recommend to avoid breaking the wood? Got a bandsaw recently (suggested by Sawinery) and I'm wondering if its safe for cutting wood with gaps like this.
ReplyDeleteThey sell that powder on Amazon fairly inexpensive. It's called photoluminescent powder, i think i paid $15 for 3 grams
ReplyDeleteIs there a US supplier of this stuff? Ebay is so saturated with similar products and I dont want to buy one that cant come close to this stuff.
ReplyDelete