Posts

Showing posts from 2015

Casting with Delft Clay

Image
A custom request from a lady of excellent taste, asking for a spitfire ring. Challenge accepted! This video shows how to casting a spitfire using the Delft clay casting system. Delft clay is an oilsand designed for fine casts - it's a mixture of sand, clay and oil. The process is fairly straightforward but as you'll see, it's not as failsafe as other casting methods. I got it right second time though!

Melting down old silver

Image
I was given a load of old sterling jewellery to make into something new. The video shows the first stage, to melt it down into useful ingots. Once poured, the ingots need cleaning to remove impurities that have come to the surface. The melt-pour-clean process may need repeating several times. Once clean, the ingots can be recast, or forged/rolled into sheet or wire. Casting video to follow soon.

The Quest for Imperfection, or In Search of Wabi-Sabi

Image
My background is in software, specifically web development. I used to do both front and back end stuff, as well as sysadmin things. I worked with graphic designers a lot, some amazingly skilled people from whom I learned the importance of getting things exactly right, visually. Exactly right. Every pixel has to be perfect, every aspect of a design thought through carefully and then polished to perfection. I'm eternally grateful for the things I learned from those people. Programming and systems admin adds a different dimension to the art of "Doing Stuff Right", that of every case being accounted for and every exception or problem caught before it happens. Beauty takes many forms, both in terms of visual design and in software too. This focus on detail, on perfection, has carried over into my current work in the physical realm. Making stuff that is machine-perfect isn't so hard. Especially when using machines (although I don't have as many machines as I'd li

Raspberry Pi and Dotstar LED Jukebox

Image
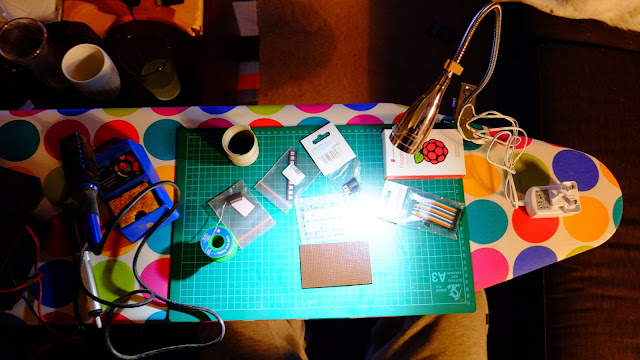
A little while ago I made a media centre for some friends, which had hardware audio playback controls. Much as I love giving people things, I was a bit jealous because it was pretty cool thing (even if I do say so myself). When the opportunity came up to make one for our upcoming wedding, I jumped at the chance, and added a few features extra to the original design. A little time scouring the internet for parts and then, time to assemble: First up, out with the ironing board (soldering iron is an iron, right?). The dotstar LEDs run at 5v and the Pi's GPIO outputs at 3.3v, so we need a level shifter/bus buffer to bump the volts up a bit. Terrible messy circuit "diagram", but it worked. You can see the LED layout down at the bottom, there are six pins on each one - power, ground, clock in, data in, clock out, data out. This means they can be chained and addressed individually by software. They're pretty smart little things. Dotstars are new and a little more f

Dotstar LEDs with Raspberry Pi - the Python bit

In this post , I showed how I made my Raspberry Pi jukebox. Here's how it is controlled. At it's core, it's just a python script which waits for interrupts from the Pi's GPIO pins. That's the easy bit (although it would be a lot easier if there wasn't two different ways to number GPIO pins - I mean really...) I do know that just making a bunch of functions isn't particularly pythonic and I should probably do something with classes and objects and stuff, but I had a really immovable deadline on this project so I just stuck with what I knew (which mostly comes from php, years ago). Adafruit provide a library to let you access the Dotstar leds, but it's pretty basic. That's cool, it was fun learning how to figure stuff out. I ended up using a couple of modules to generate colour gradients and to shift between various colourspaces. A nifty thing happened when I wanted to flash random, but bright colours as part of rave mode. Taking random RGB va

Experiments in using solder paste

Image
Generally when joining metal I use sheet solder, which is economical and in most cases, easy and fast to use. But sometimes it can be a pain to get solder in place around a particularly tiny piece, so I thought I'd have a go with silver solder paste  instead. It's a bit more expensive but it lasts for ages. I'm starting out with a plain silver ring , to which I'm going to solder some silver and copper blobs. Blobby blobby blobby! OK, right. Here we go. Excuse my fingernails, I've been testing out gilding nails with copper leaf. It actually worked pretty well, this is a few days afterwards.. Dot punch to start with. Stops the drill skipping off the surface of the ring. Bzzzzzzzz. Only drill a bit into the surface, don't go all the way through. Repeat until lots of holes. This is fine silver casting grain, usually used for melting down prior to turning into other exciting stuff , but this shape is exactly what I want for this ring. Carefull

A Raspberry Pi Media Centre

Image
OK, so there's a million of these out there. This one is for some friends of mine. It's a Model B Pi running Kodi (previously known as XBMC) with a 1TB disk, wifi etc. Two bits I like and make it a bit different - the handmade wood case, and the switches. The case is cedar and purpleheart, so it looks striking and smells amazing. The big chunky toggle switches are set up to play music, so it can work as a jukebox without needing the TV on to access controls. There's a python script to do this, which I'll detail later. So, without further ado, the build. First up, making the case. I cut some channels into the cedar to slide the base into later (I don't have a full-size router so I did it with my 3KW mitre saw - luckily this is nice chunky wood so I could make those cuts without risking going all the way through). Clamp them bad boys up to the piece of purpleheart that is the front of the box (never enough clamps....) with some woodglue, leave for 24 hours.