Posts

Showing posts with the label video

Jewellery Pickle Comparison and Test (aka, The Great British Pickle Off)

Image
The question of pickling jewellery seems to come up quite a lot. What can I use as pickle? What's the best? Short answer is that any acid will work to "pickle" (to remove oxides from after heating) copper or silver. Longer answer is that some acids are more effective, quicker, than others. Much longer answer is this video in which I test vinegar, citric acid, sodium bisulphate (aka pH down aka safety pickle) and phosphoric acid against each other. For some reason Blogger embeds video at tiny size, so if you'd prefer then  click here to watch on YouTube .

Making a wooden ring - choose your own adventure

Image
So, I make quite a few tutorial videos and people always say "yeah, that's cool but what if I don't have all that gear" Well, hopefully this video addresses that problem.

Casting with Delft Clay

Image
A custom request from a lady of excellent taste, asking for a spitfire ring. Challenge accepted! This video shows how to casting a spitfire using the Delft clay casting system. Delft clay is an oilsand designed for fine casts - it's a mixture of sand, clay and oil. The process is fairly straightforward but as you'll see, it's not as failsafe as other casting methods. I got it right second time though!

Melting down old silver

Image
I was given a load of old sterling jewellery to make into something new. The video shows the first stage, to melt it down into useful ingots. Once poured, the ingots need cleaning to remove impurities that have come to the surface. The melt-pour-clean process may need repeating several times. Once clean, the ingots can be recast, or forged/rolled into sheet or wire. Casting video to follow soon.

Raspberry Pi and Dotstar LED Jukebox

Image
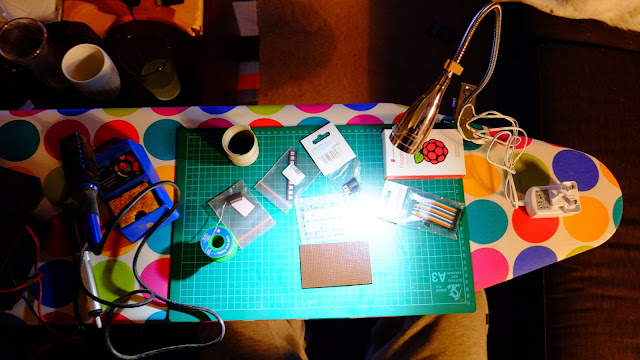
A little while ago I made a media centre for some friends, which had hardware audio playback controls. Much as I love giving people things, I was a bit jealous because it was pretty cool thing (even if I do say so myself). When the opportunity came up to make one for our upcoming wedding, I jumped at the chance, and added a few features extra to the original design. A little time scouring the internet for parts and then, time to assemble: First up, out with the ironing board (soldering iron is an iron, right?). The dotstar LEDs run at 5v and the Pi's GPIO outputs at 3.3v, so we need a level shifter/bus buffer to bump the volts up a bit. Terrible messy circuit "diagram", but it worked. You can see the LED layout down at the bottom, there are six pins on each one - power, ground, clock in, data in, clock out, data out. This means they can be chained and addressed individually by software. They're pretty smart little things. Dotstars are new and a little more f...

Soldering a Simple Silver Ring

Image
I was asked about doing a tutorial on soldering. So here it is. Soldering is much easier than it looks - with a bit of practice you can be making bezels, joining bits of wire and much more. Main things to remember are clean joins and to heat the piece not the solder. Spending time getting everything nice and clean and properly in place before you get the blowtorch out is important. Notice how much time, even speeded up, I spend aligning the piece of silver in this video. I've heard the word "light-tight" used to check a joint is ready for soldering - if you can see air between the two bits of metal, your joint isn't lined up correctly. Some people say solder won't fill gaps, but it will. That's not an excuse to not having your joints line up though! This ring was only polished to about 800 grit (the  radial polishing discs  you see towards the end are awesome!) so it's still a little satin-y to look at. There's nothing to stop you polishing it al...

Finishing Rings with CA (Superglue)

Image
Wooden rings benefit from a good tough, protective coating both for visual appeal and to keep them safe from scratches and knocks. CA (superglue) is perfect for this. It dries very hard, very tough and super glossy. The process for finishing a ring is pretty easy. It's as simple as building a few layers on the ring, sanding flat and then polishing to a shine. The ring featured below only took ten minutes from start to finish, which is helped by using an accelerator spray on the CA, but even without that you can do the whole job in well under an hour. Before starting, the ring has been sanded to 1500 grit, dusted and cleaned with white spirit, then mounted on my turning jig (OK, OK, it's a power drill clamped to my bench - but it works!). This process can be used for metal rings too - a coat of CA will protect a gilded finish, or stop copper from tarnishing. For a change, I've made a video of the process rather than photos. Here we go, apologies in advance for dodgy ed...