Electrum Wedding Rings
I was asked by some friends recently if I could make them some wedding rings from electrum. Electrum is an alloy of gold and silver, and it's incredibly pretty. But it's kind of hard to work - the standard way of making a ring, by folding a piece of sheet or wire and soldering it closed doesn't work. While electrum is very hard, it has a relatively low melting point, so you can't use normal silver solder on it (also, silver or gold solder would show up as a visible join). I have fused a few rings from sheet electrum, but it's very hard to get a clean join - the ring ended up slightly asymmetric, which isn't always a problem but for wedding rings it didn't seem right.
So, time to learn how to cast metal. I bought a Delft Clay Casting kit and got to practising. After a few goes I dived right on in to making the rings. It's a fairly simple process but an interesting one.
First up, making a wooden former which is slightly smaller on the inside and slightly larger on the outside than the final ring should be. I make a lot of wooden rings so this was pretty straightforward.
 I had measurements to work to down to 0.1mm resolution, and sizing is really important. I love my Vernier calipers.
 Next, it's time to get the mould ready. Delft clay is a mixture of sand, oil and clay. It needs chopping up before use to make sure there are no lumps to get in the way.
 Now, hammer it down into one of the rings provided. Pack it nice and tight.

Awwww yeah, that's nice and satisfying and smooth.
 Now, the wooden former is pushed into the lower ring, and dusted with talc to prevent sticking.


 Uh-huh, lovely and smooth. Note the registration marks on the two rings, so we can line them up again after taking apart.
 Next stage is the fiddly one. We need to cut a throat in the top clay to pour the metal into, and a series of vents to let the air out. Start off by pushing a wire through the packed sand, and slowly widen it out as required.
 Vent holes and inlet holes cut. Next, the two rings are fitted back together again to make a complete mould.
 OK, mould is good to go. Let's weigh out some metal - this mix is 60/40 silver/gold, and includes a ring which belonged to the grandfather, and then mother, of one of the brides. Nice to keep these things going, I think. The ring was gold but it looks a bit scorched where I burned the polish off it.
Also in there is fine silver grain and pure gold grain. I'll add a borax flux in the melting dish to make everything melts down nice and clean.
 Right, time to melt. Set blowtorch to full power. Nothing like some 1000C+ melting to warm up a chilly winter workshop.
 No photos of the actual pouring as I can't throw around a dish full of molten metal and a camera at once! It's a single, smooth motion straight into the throat which was cut into the clay earlier.
Ssssssshmmoking!


When it does work, cracking open the mould to find a fully cast ring is so very satisfying.
 Some cleanup to be done. Sprue is an excellent word.
 Chop off the big bits with a saw. The 'spare' metal will go into making the other ring, and what's left from that will end up as matching jewellery, possibly for bridesmaids.
 Onto the wet grinding wheel to get rid of the nastier chunks.


Coming together now, but still plenty of cleanup left to do.

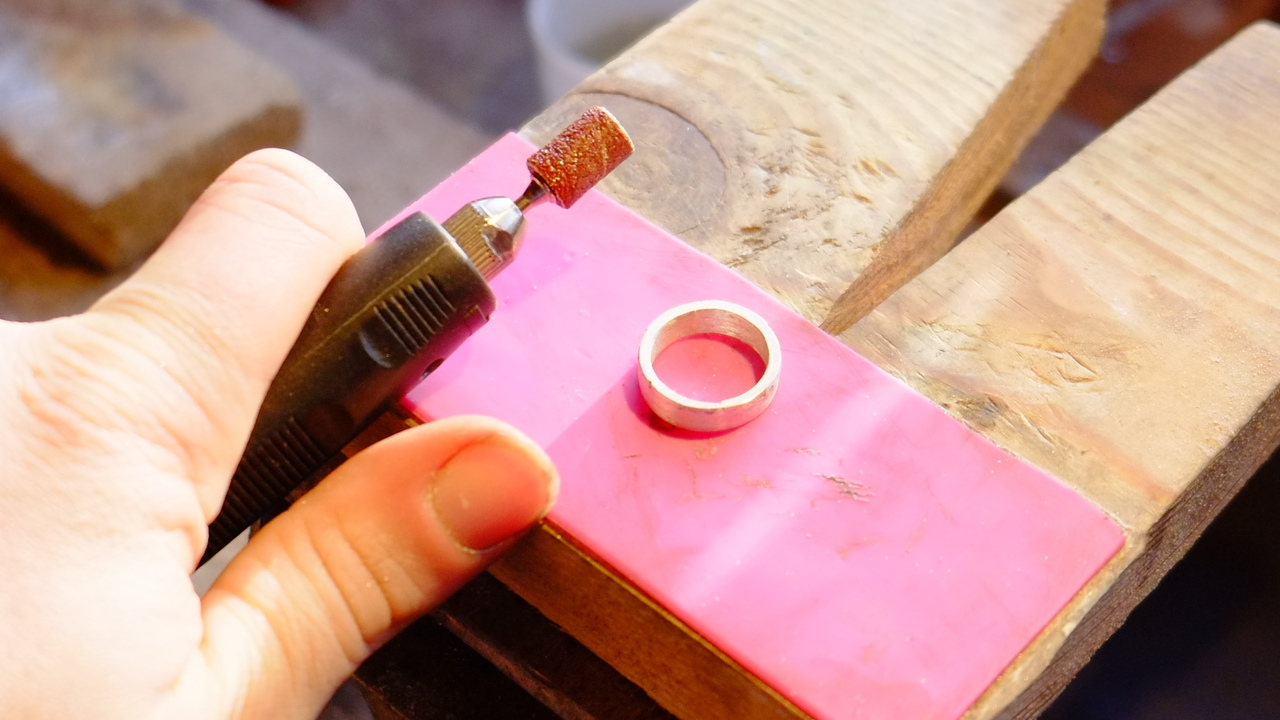
Back onto the turning jig (I'm not about to use the word 'lathe' to describe a power drill clamped to a bench) for fine sanding.

Almost done. The black mark is Sharpie so I can see how many times I've rotated the ring while shaping the inside profile, it will polish off.


Final polish, with jeweller's rouge. Wearing gloves not to protect my delicate skin, but to keep my dirty fingers off the nice shiny ring!
 Finished product. Two rings: 40% gold, 100% beautiful. They fit the happy couple perfectly, and they were both really pleased with them. It was a huge honour for me to be asked to make their rings, and I'm really looking forward to the wedding next month.


Usual spam for my Etsy store.
So, time to learn how to cast metal. I bought a Delft Clay Casting kit and got to practising. After a few goes I dived right on in to making the rings. It's a fairly simple process but an interesting one.
First up, making a wooden former which is slightly smaller on the inside and slightly larger on the outside than the final ring should be. I make a lot of wooden rings so this was pretty straightforward.
Awwww yeah, that's nice and satisfying and smooth.
Top ring fits on, ready to get filled with clay.
Now just fill up the top ring and tamp down again.
Also in there is fine silver grain and pure gold grain. I'll add a borax flux in the melting dish to make everything melts down nice and clean.
Ssssssshmmoking!
After all that, failure. :(
Deep breath. It's not a failure, it's a learning experience. Metal wasn't hot enough, or the hole to pour into was too small, or both (or maybe something else). Reset and try again.
When it does work, cracking open the mould to find a fully cast ring is so very satisfying.
Still pretty gnarly but it's getting there.
I probably shouldn't use sandpaper for this, but I got a load of these free with my dremel-a-like and I have to use them for something. It works.
Coming together now, but still plenty of cleanup left to do.
Back onto the turning jig (I'm not about to use the word 'lathe' to describe a power drill clamped to a bench) for fine sanding.
Almost done. The black mark is Sharpie so I can see how many times I've rotated the ring while shaping the inside profile, it will polish off.
Keep going with the sandpaper, from 320 to 600 to 1200 and finally 1500 grit - and it's starting to look like a finished ring.
Final polish, with jeweller's rouge. Wearing gloves not to protect my delicate skin, but to keep my dirty fingers off the nice shiny ring!
Usual spam for my Etsy store.


Very cool!
ReplyDeleteThanks for sharing ;)
That's pretty awesome. I think this would make for a fun hobby, but with alloys to keep cost down
ReplyDeleteGorgeous!
ReplyDeleteElectrum has trace amounts of copper in it too actually...that's why it's green gold
ReplyDeleteThis comment has been removed by the author.
ReplyDeleteIt's a little bit lower 10 karats gold without copper alloy.
ReplyDeletenice
ReplyDeleteThat's really pretty. I may be contacting you at some point as this has been on my mind for wedding bands.
ReplyDeleteThat's really pretty.
ReplyDelete