How To Apply Varnish For Excellent Finishes
Finishing can be fiddly. Sprayed lacquer is good, but spray guns are expensive and so is the stuff to put in them. Plus you can forget about breathing in your workshop for a few hours after each spray session. Applying a wax coat is quick and easy, does bring out some of the lustre of a wood, but it's easily damaged and needs reapplication regularly.
Somewhere in between is this technique for applying standard off-the-shelf varnish to get a tough, durable, glassy smooth finish. It takes a little time, but mostly just waiting for each coat to dry. If you have somewhere dust-free you can leave pieces to cure, you can get on with other things in the meantime. Like with most things, don't rush it, be careful, practice a bit and you'll be able to get awesome finishes every time.
Here is a piece of teak, which has been cut, shaped and sanded until perfectly smooth and ready to be finished. It's a nice shape, and it's pleasing to touch, but it doesn't look as good as it could. So it's time to apply a finish.


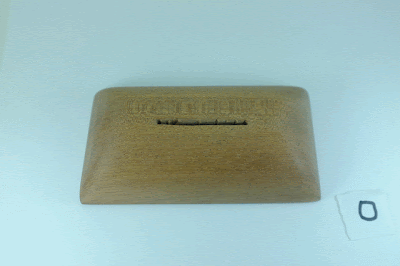
 This piece is a stand for a bit of metal I found on a beach known for occasional bits of WW2 wreckage. Who knows, perhaps it's part of a Spitfire! Polished and mounted I think it looks pretty good, but importantly compare the warmth, lustre and sheen of the teak to how it looks in the first image.

Somewhere in between is this technique for applying standard off-the-shelf varnish to get a tough, durable, glassy smooth finish. It takes a little time, but mostly just waiting for each coat to dry. If you have somewhere dust-free you can leave pieces to cure, you can get on with other things in the meantime. Like with most things, don't rush it, be careful, practice a bit and you'll be able to get awesome finishes every time.
Here is a piece of teak, which has been cut, shaped and sanded until perfectly smooth and ready to be finished. It's a nice shape, and it's pleasing to touch, but it doesn't look as good as it could. So it's time to apply a finish.

OK, so this is pretty easy. Grab a nice lint-free rag - old, well-washed t-shirts are perfect for this, and a handful of cotton wool. Ball the cotton wool up in the rag so you have a soft, smooth pad.


Told you this was easy.

Next stage, get a little varnish onto your pad, and just wipe it on to the wood. It's that simple. Work gently and smoothly in the direction of the grain, making sure you cover it all evenly.
I'm using Ronseal's Quick Drying Gloss varnish here, which is water based so it's a little easier to handle, but use whatever you prefer.

Immediately it'll start to look more awesome. You're aiming to get a thin, even layer of varnish onto the wood, and then build up these layers with more and more coats until you have the finish you want.
Now put it somewhere safe and let it dry properly. For a quick drying varnish like this one in a hot sunny workshop, that's about 20 minutes, but you could be looking at overnight depending on conditions and choice of finish.
The next stage is the one beginners can feel strange about. I certainly did, it seems counter-intuitive. But now you sand it. Yup. You sand it.
Use a high grit paper and be gentle, you're not aiming to get the varnish off the wood and undo all your hard work. What you're doing is twofold - you're smoothing out any imperfections in the previous coat, and you're roughening it up a bit so the next coat has something to 'key' onto.
This photo is from later on in the process where I'm using 000 grade wire wool rather than sandpaper, but the principle is the same.

That's almost it, buff the dust from the sandpaper or wire wool off and you've finished your first coat. Just repeat that process a few times and you're done. Make sure you use a fresh area of the rag each time so the pad is still nice and soft and smooth. If you want, you can use a disposable applicator like a bit of kitchen paper for the first few coats, and only move to the rag+cotton technique for the last couple.
Don't sand the final coat, unless you want a satin finish - in which case do!
How many coats you need is dependant on a few things, but I find at least eight is good, usually a few more. The gif below shows 12 coats, just so you can see the difference, but experiment and find what works for you and the wood you're working with.

Once your final coat is on, give it a quick buff, add a finishing wax if you want that little bit of extra sheen and fire up your lightbox to take a showy-off photo of the finished piece.


awesome work, keep it up
ReplyDelete